
Follow these simple but effective interior photography tips if you’re involved in architecture and interior shooting, real estate business. If you’re an interior photographer, the ability to present the subject correctly and effectively is almost an obligatory requirement for career growth.
To improve your photography skills, we’ve put together key interior photography tips. You can contact professional photographers in Calgary that will help you take better and more beautiful interior design images.
1. Prepare the Room Before Shooting
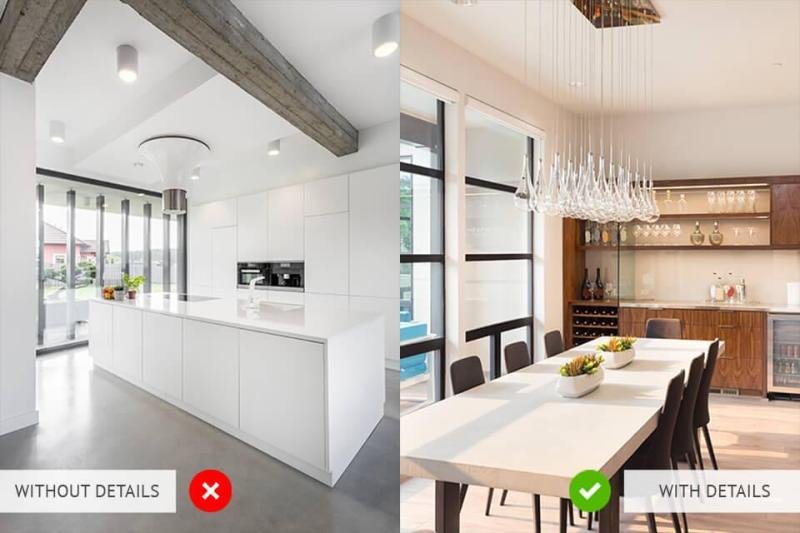
You need to find out what type of shooting your client is interested in. If it is an advertisement of the property, then having various knick-knacks in the frame won’t be a problem.
But if you take images that will be further used for selling an apartment/house, then there should be nothing distracting in the photo. Some photographers don’t really care about such nuances, but, actually, this is one of the most important interior design photography tips. Nowadays, there are various photoshoot rental spaces available with tons of natural light. You can also hire them for your photoshoot.
After clarifying the type of shooting, you need to go around the building, choose the best shooting angles and see whether there are any problems with lighting. Think over the plot of your shooting according to the atmosphere of the house, add details to the scene, because a smartly-placed sofa cushion or a stack of newspapers will probably become that necessary detail that will balance the whole scene.
2. The Most Difficult Task Is to Choose the Proper Lighting
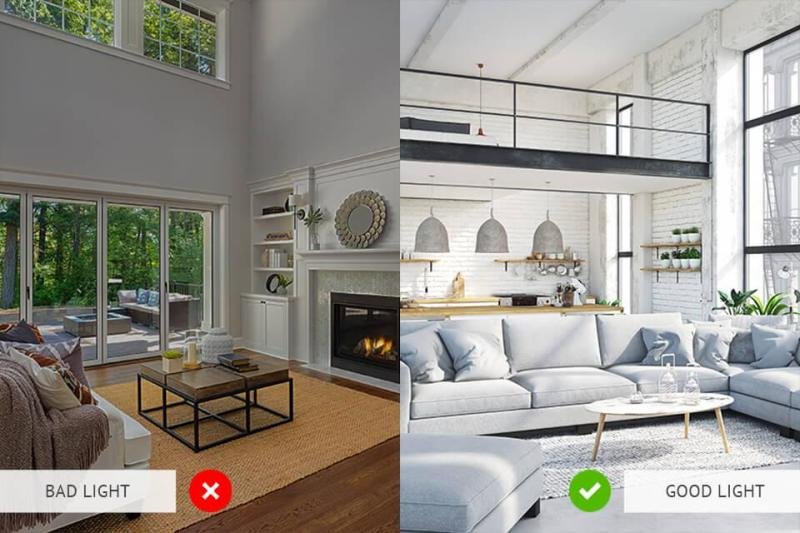
While photographing property, remember about interior photography tips concerning lighting. Every photographer needs to balance the light so that there are no overexposed or dark places in the frame.
Use all available natural light, but since there are may be differences in illumination, resort to studio lighting gear to illuminate the “dark corners”.
When studying the place, take a few test shots. Evaluate the results for reflections and highlights, too dark or light areas.
The natural light is the best choice if you photograph interiors. Just take images at intervals of several seconds. If you need to light some areas – use several additional pulsed light sources that should reach the scene along the axis of the lens.
The main thing is to avoid a striking difference in color temperature between the light from the window and the light from incandescent lamps. To do this – shoot in RAW.
Thus, it will be convenient to adjust the white balance in individual parts of the picture. You can also download Free Real Estate Interior Lightroom Presets and use them to fix minor lighting issues.
3. Use Suitable Optics
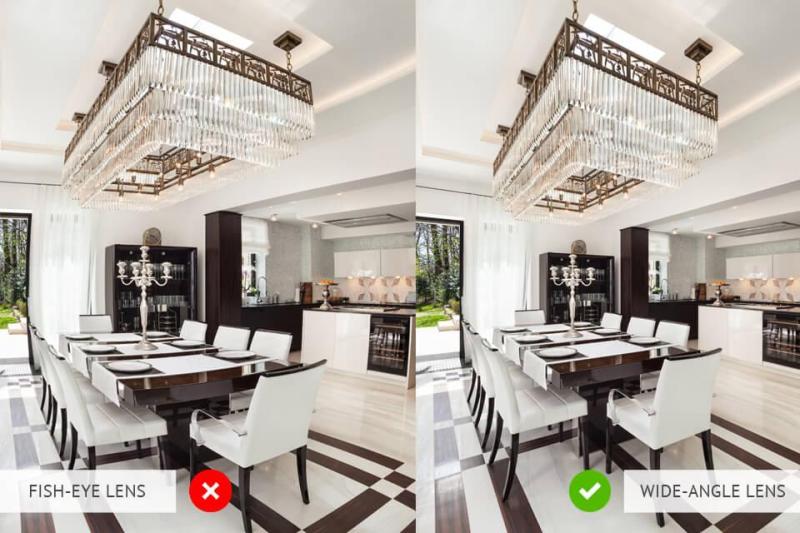
The “the wider – the better” principle does not work in interior photography. Yes, you need a wide-angle lens, but its focal length should not be lower than 14mm, otherwise, there will appear a fish-eye effect that will only ruin your pictures.
An excellent choice is to work with 16–35 mm f/4. Focal lengths from 16 to 24 millimeters will allow you to cover the entire space and, at the same time, won’t distort the line.
You should not chase the aperture value, because you probably don’t want to blur something in your shots, and shooting from a tripod, you’ll be able to compensate the lack of light.
In addition to the wide-angle lens, take a “standard” lens 50mm or zoom 24-70mm; it is necessary for shooting close-ups.
4. Shoot From the Corner
This is the most important interior design tip and it is very simple: photograph from the corners of the room in order to give it a more spacious look. Such an angle will make the room more humanized and interesting to the viewers, visually expanding.
It is advisable to shoot from a low position with a wide-angle lens.
When shooting from a corner, it is important to remember that there should be no more than two walls in the frame, since a third wall will violate the composition.
To place three walls in a frame, you need to take a geometrically aligned photo where one wall will be in the center and two others – on both sides.
5. Check the Camera Level
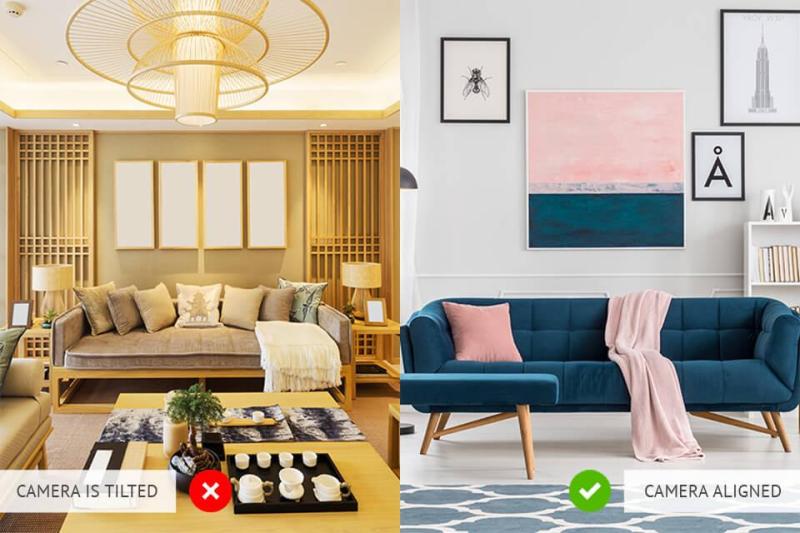
You probably know that you need a camera tripod to get high-quality interior images. It also helps experiment with shutter speeds and shoot in HDR.
You should ensure that your camera is not tilted up or down, left or right. Most tripods come with a small waterpass for this purpose. When the small bubble is centered, the camera is in the correct position.
Also, many cameras have a built-in level – there are lines on the focusing screen that moves when a camera tilts. When these lines are level, you know that a camera is perfectly balanced.
Following this simple interior photography tip, you can avoid lots of problems in image post-production.
6. Don’t Forget about HDR Shooting

Photographing room in which there is a window seen in the frame, you can notice that the place isn’t evenly lit, but there is a strong overexposure in the window, or the window area is ideally visible, and the room practically disappears in the shadows.
In both cases, the details (in overexposed or shadowed parts) remain unclear. The only helpful interior architecture photography tip in this case, is to use HDR technique.
HDR photography is the result of exposure bracketing. To do this, you need to take a series of shots with a difference in exposure of ± 3 steps.
Usually this is a series of three shots (modern cameras have a built-in HDR mode that can be activated). The first frame features details in the light, the second in medium tones, and the third – in shadows.
All three pictures are combined into one. The result is a photograph with well-developed light and dark areas. If you doubt that you can achieve this effect using your camera, download Free HDR Photoshop Actions to make it in several mouse clicks.
7. Obligatory Photo Color Correction

You have to pay special attention to the geometry of the interior image – align the photo so that the vertical lines (walls, wardrobes, doorways) are strictly vertical, as they are usually perceived by the human eye.
Then check the white balance, exposure, light and shadow settings, contrast – if necessary, tweak them.
As for the color, it is important to adjust the temperature of the light and the brightness of the tones; most often this is done separately for different parts of the picture.
If you can’t cope with the task on your own, address interior and real estate photo editing services and get everything done by professionals.


